The goal is to design a mouse trap car to travel the farthest distance.
The mousetrap cannot be physically altered except for the following:
a. holes can be drilled only to mount the mouse trap to a frame
b. the mouse trap's snapper arm may be cut and lengthened
3. Vehicles must be self-starting. They may not start with any additional potential and/ornkinetic energy other than what can be stored in the mouse trap's spring.
4. The spring from the mouse trap cannot be altered or heat treated.
5. The mouse trap's spring cannot be wound more than its normal travel distance or 180 degrees, and you may not use any intermediate stage pullies to transfer the energy from the spring to the drive axel.
6. The vehicle must steer itself and may not receive a push in any direction in order to avoid a collision.
Brainstorming
How we started
|
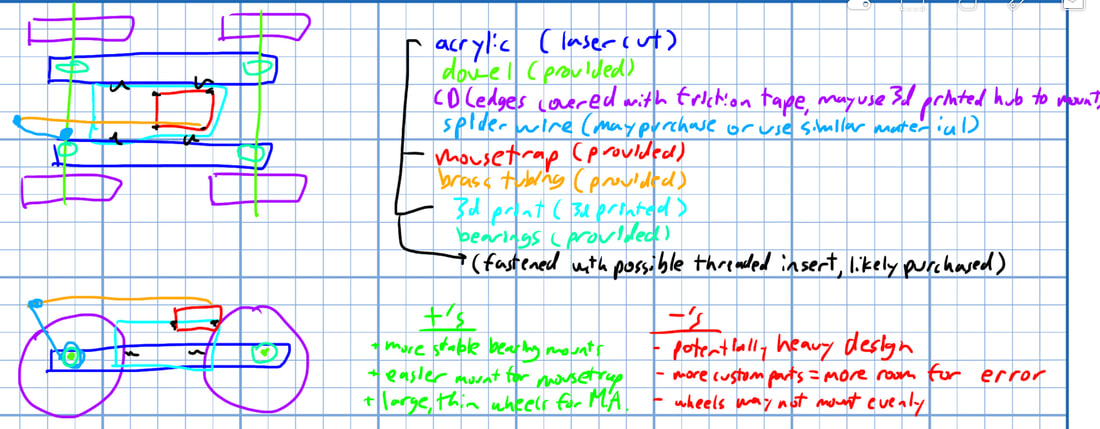
Before we started to create a CAD model, we first decided to figure out how we would secure the mousetrap mount and to secure our wheels in place.
Our first idea for the mousetrap was to zip tie it to a 3D printed base. For the wheels, we wanted to add a bushing between a CD and the drive axles to secure the wheel in place. From there, we would connect the primary components using a set of custom-cut plates and nuts/bolts (using custom printed brackets if necessary). Our second idea was to combine the mousetrap mount and the structure that supported the wheels together with a custom part, using the same idea as #1 for the wheels to try and use a bushing to utilize CD's as the wheels. After much deliberation we decided to go with idea #1 for its more flexible execution in letting us control the mousetrap mount and general structure independently of each other if needed. The decision for this was also influenced by us figuring out how we would build our first iteration, we started to look at what materials we would use while staying on budget, using the provided class resources like the 3d printers and laser cutter. |
Idea #1

Idea #2
|
Prototyping
Going through the process
Prototype #2 (unfortunately we have no images of Prototype #1 (with the mixed color mount))
|
With prototyping, our goal was to try and assemble our ideas as fast as possible so we could test them as fast as possible, giving us more time to analyze and improve our designs. During this process, we ended up entirely working on idea #1 because we were making improvements continuously to produce new prototypes.
During our prototyping assembly process, we made some major discoveries:
Here is a list of changes we made with each prototype:
Eventually, #4 had become our final design as we had run out of time to continue iterating our design. We decided not to revert back to any of our previous designs as we saw that our most recent design was good enough to succeed in the competition. |
Prototype #3

Shown are the three different mousetrap mounts created:
1. Top mount (less width to reduce weight, 50% infill (for structural support), and material and holes to insert attachment pins)
2. Left Mount (extended length to enable lever arm to function properly (by aligning it directly across the axle hook), holes to insert attachment pins, and reduced infill to save weight (15%).
3. Right Mount (shorter frame to reduce material, 10% infill, and holes/sidewalls removed as they were no longer needed)
|
Final Iteration/Results
|
B.I.G.G.I.E. C.H.E.E.S.E.
With our final prototype, we were able to achieve the following distances in trial testing:
In regards to our goals, we are satisfied with how this mousetrap car performed with its consistency in self-starting and overall robustness in action. Here is a list of overall components in our final design:
In regards to the Bill of Materials, we had actually ended up using $0 in terms of the $20 allocated to outside-of-class-materials:
|

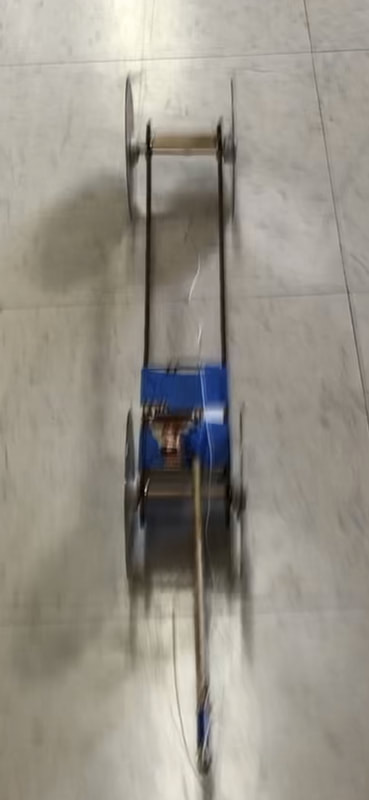
Prototype #4/Final
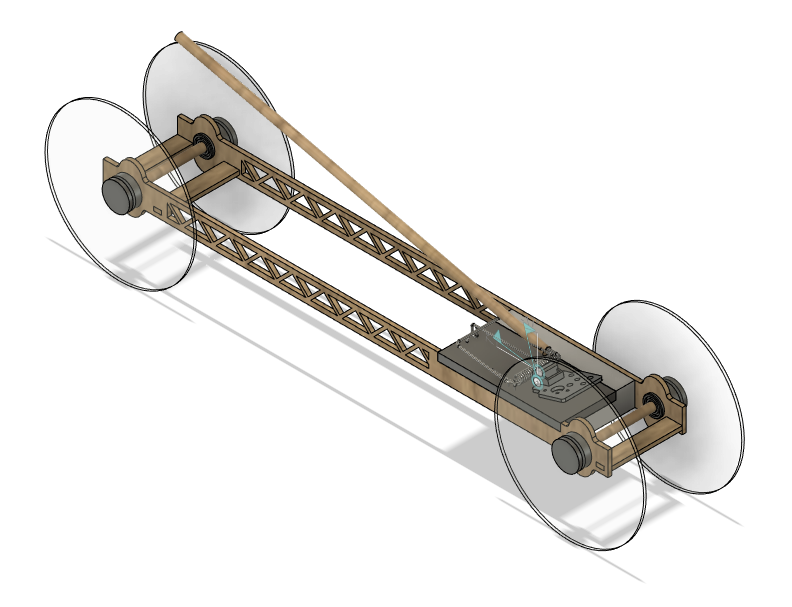
Prototype #4/Final CAD
|
